Early modern TimeSpan elements in KML
Google Earth can be a very useful tool for visualizing historical change, however encoding dates can be difficult. GE does not make this particularly easy to do from its graphical user interface (i.e. the Google Earth application), which obstinately refuses to accept any year before 1752. However you can circumvent this odd restriction by directly editing the text versions of the KML files you create with Google Earth.
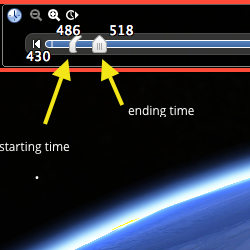
The Google Earth time slider
KMZ vs. KML
When you save your GE map, you have an option to save it as .kmz or .kml. These are related files, but they do very different things. KML stands for Keyhole Markup Language, and it is the real meat of your map file that holds all of the placemarks, polygons, lines, description texts, and folder structure of your map.
Some GE maps pull in image overlays. When you save your map as a .kml, GE references the location of these images in your file system but does not actually save the images themselves in the map file. In order to see it properly, the user needs the .kml file as well as all the separate image files that you’ve referenced.
To make sharing and publishing easy, you can later save the file as a .kmz, which automatically bundles any external images with your .kml file. Don’t save your file as .kmz until you are ready to send it to another computer or upload it to ELMS
You will need to save your in-progress map (as a .kml file!!) to your desktop or some other folder on your computer so that we can open it up in a text editor. We need to manipulate the .kml file in order to add TimeSpan elements. Once we have added them and are ready to bundle our images, then we can save the file as .kmz.
Inserting new tags in KML code
To look at the underlying code of your GE map, you need to open the .kml file with a text editor. You can use the built-in applications like Notepad or Text Edit, but it is even better to get an app that will color-code elements, making them easier to read. Great free apps with code highlighting include TextWrangler (OS X) and Notepad++ (Windows).
Once you have a good text editor set up, open your KML file. The start of the file ought to look something like this:
Like HTML code used to write webpages, KML comprises a bunch of nested elements or “tags”, some of which you can already guess at. The KML file starts with a <Document> tag, and way at the bottom you’ll find a </Document> closing tag (note the / indicating this is closing, or “balancing” the first tag.) Together, they create a Document element.
KML files start with a long list of Style elements. Scroll past these until you get to <Folder> and <Placemark> elements. Inside these tags is all the info shown on your map.
What element should I add a <TimeSpan> to?
The <TimeSpan> element will apply to the element it is nested in. If you place the tag within a <Placemark> tag, then GE will only apply it to that <Placemark> element. If you put it immediately inside a <Folder> tag, then the <TimeSpan> will apply to all the placemarks, polygons, and lines within that folder, which can make your work go a lot faster!
Take a look at the two examples below. In the first, the <TimeSpan> element will only apply to the <Placemark> element it sits inside.
In the second, the <TimeSpan> element sits in the <Folder> element, and so will apply to everything in that folder.
TimeSpan elements follow the ISO 8601 standard for representing dates and times, formed as YYYY-MM-DD. You can be specific down to the second by adding THH:MM:SS±HH (that last bit being the hours added or subtracted to correct for time zone).
nb. TimeSpan can be given a <begin> tag with no <end> tag, and vice versa.
For all the details of <TimeSpan>s, see Google’s KML documentation. Here you can find information on using the related <TimeStamp> element, which is useful for marking events that take place in one moment of time, rather than a defined span.
Check your work
Once you have added in your <TimeSpan> elements, make sure to save the file making sure that you give it the ending .kml. You can then open this file like usual in GE, and you should now see a time slider in the upper left-hand corner of the screen. Double-clicking on an element in the left-hand sidebar will automatically set the time slider to that element’s <TimeSpan>, displaying all the other elements that fall into that same range - something very useful indeed!
If you make any further changes to your file through the usual GE interface, remember that you should save it as a .kml file instead of a .kmz file if you need to go in with your text editor and muck around with more <TimeSpan> elements.
